Showing posts with label Hand Made. Show all posts

Saturday, 6 August 2016

Inspiration by Gwyneth - August 2016 - Summer Sunset

Good Morning Everybody!


Hi everybody.

The new collection, launched in the Dragons Lair Designs online store on the 1st August, is called "Summer Sunset", and all the DLD Inspiration Blog DT members have been given the collection to work with for their Inspiration posts this month - with many choosing to volunteer to make extra creations - which does show that we really like working with it.

For the launch I made a digital scrapbook layout showing a photo I'd taken of a flower some years ago.  Having gone digital that time I decided to go into mixed media for this inspiration and decorate a box.

This is what I started with -

These are what I used:

Stamping Dragon Designs Item:
Items from the "Summer Sunset" collection available - here - in the store.

Consumables:
250gsm Super Smooth A4 white cardstock; Tonic Funky Glue; Pinflair Glue Gel; Three colours of Cosmic Shimmer Paint
Equipment:
Scissors; My Craft Studio Elite Software; Baby Blue Die Cutting Machine; Tonic Butterfly Die
Tattered Lace Flower Die; Non-stick Craft Sheet; Paint Brush; Pallette; Sponge; Pokey Tool

Method:
I printed out one of the background sheets from the collection, that had a circular centre panel, a couple of times.  I then took a leaf into My Craft Studio, re-sized it and copied it several times over the working area.  I also added a heart from the digital collection.  I then printed this sheet of elements out as well.
 
As I was using paint I had to de-camp from bed to work on the kitchen table, so tidied a corner and laid down my Craft Sheet to work on.
 
This is what it looked like after I'd finished and was ready to put everything away (I had put the die-cutting machine away before painting as knowing me I'd have got the paint over that as well!)
The first thing I did was cut out the circular panel from one of the backgrounds I'd printed, leaving a border around the circle to frame it.
 
I then took some of the background, cutting panels to the same size as the plate of the die-cutting machine, and cut out three spiral flowers.  I decided to have a splash of contrast so cut the butterfly out of white cardstock.
 
I turned over the outside edge of each of the flower spirals before strating to turn them into flowers so that the "petals" would turn outwards and not show so much white edge in the finished flowers.  After twisting into the flowers I glued the backs in place with Funky Glue and put to one side to dry.
 
I cut out some leaves and the heart from the element sheet.
 
I painted the inside of the box and lid using the gold coloured paint, and when dry stuck the heart in the bottom.
For the outside of the box base and lid I used a sponge, rather than a brush, to add the paint, as I wanted a bit of a textured look. I "pounced" the sponge rather than wiping the paint on.
 
I started with the bronze colour paint all over.  I then used a small amount of gold on my sponge - dabbing it off so that it was practically dry before dabbing the gold at random over the box base and top of the lid.  I finished off by doing the same with the dark brown colour.  This gives the box a bit of a vintage look.


 Once the paint was dry I used the Pinflair Glue Gel to attach firstly the circular panel and then the flowers.  I used a bit of the funky glue under the centre to attach the butterfly.
 
 And this is what the box looks like from the top.
 

- o O o -
And that is it from me for today.
Please keep coming back regularly to look at new posts as, over the next few weeks, you'll find various "Inspiration by ..." posts appear on this "Dragons Lair Designs Inspiration Blog", as well as other posts by different Design Team members.  I'll be back with more posts over the coming months as well, so keep an eye out for those.

Till next time - Have Fun Crafting!
Dragons Lair Designs Inspiration Blog Design Team Leader
(And if you are wondering "who's Gwyneth?" - then you'll find an "About Me and My Blog!" piece on my blog.)

------------------------------------------------------------

Stamping Dragon Designs Links
  • If you fancy trying out some of Dragons Lair Designs, please do visit the Store to find all sorts of digital goodies (you'll find great digi-stamps and lots more).
  • We are also on Etsy, so you can pop along - here - to find some Dragons Lair Designs digital downloads.
  • And why not join the "Dragons Lair Designs Fan Group" Facebook group. It's a small, fun, group where we have lots of different activities which include exclusive challenges, daily inspiration and giveaways - and there's a loyalty club for those who take part as well.
  • "Like" Us on Facebook
  • Dragons Lair Designs Challenge Blog : new challenge 1st Friday every month
  • Follow designer Janette Padley on Pinterest!
  • See us on CraftsUPrint
  • And on Etsy

Monday, 4 July 2016

Inspiration by Gwyneth - July 2016 - Seaside Retreat

Good Morning Everybody!

Hi everybody.

For our July posts every Dragons Lair Designs Inspiration Blog Design Team member will be working with the wonderful new collection "Seaside Retreat" that was launched in the Dragons Lair Designs Store on the 1st.  This collection is certainly apt for this time of year and perfect, not only for scrapbooking and digi-scrapping all the photos taken on seaside trips and holidays, but also ideal for summer birthday cards and for home decor items as well.

I've already shown everybody a shaker card I made using items from the collection, but today I'd like to show you a framed bit of home decor.


These are what I used:

Stamping Dragon Designs Item:
Items from the "Seaside Retreat" collection available - here - in the store.

Consumables:
250gsm Super Smooth A4 white cardstock; Tonic Funky Glue; Pinflair Glue Gel; Ultra tacky red back sticky tape; Foam Pads; Hunkydory Shadowbox Frames; Blue ProMarker
Equipment:
Scissors; Craft Knife; My Craft Studio Elite Software

Method:
I printed out one of the blue backgrounds from the collection. I also took the sailing boat, anchor and seagull into the My Craft Studio software and resized them to the size I required before also printing them out.  These elements were then cut out.

I tore the blue background into random, white tipped, waves.  
 
Having stuck a white background to the inside back of the shadowbox frame I coloured in a blue clowdy sky with my ProMarker.

I then stuck the sea waves using funky glue along the bottom edges of each.  
 
I folded the frame into shape and used tape to attach the foiled frame on top.
 
I used foam pads and glue gel to attach the elements in place, giving shape to the sails and boat before sticking down. 

Here's an angled shot of my creation to try and show the dimension.

 And here's a closeup of the sailing boat.

- o O o -
And that is it from me for today.
Please keep coming back regularly to look at new posts as, over the next few weeks, you'll find various "Inspiration by ..." posts appear on this "Dragons Lair Designs Inspiration Blog", as well as other posts by different Design Team members.  I'll be back with more posts over the coming months as well, so keep an eye out for those.

Till next time - Have Fun Crafting!
Dragons Lair Designs Inspiration Blog Design Team Leader
(And if you are wondering "who's Gwyneth?" - then you'll find an "About Me and My Blog!" piece on my blog.)

------------------------------------------------------------

Stamping Dragon Designs Links
  • If you fancy trying out some of Dragons Lair Designs, please do visit the Store to find all sorts of digital goodies (you'll find great digi-stamps and lots more).
  • We are also on Etsy, so you can pop along - here - to find some Dragons Lair Designs digital downloads.
  • And why not join the "Dragons Lair Designs Fan Group" Facebook group. It's a small, fun, group where we have lots of different activities which include exclusive challenges, daily inspiration and giveaways - and there's a loyalty club for those who take part as well.
  • "Like" Us on Facebook
  • Dragons Lair Designs Challenge Blog : new challenge 1st Friday every month
  • Follow designer Janette Padley on Pinterest!
  • See us on CraftsUPrint
  • And on Etsy

Monday, 6 June 2016

Inspiration by Gwyneth - June 2016 - A Taste of Summer

Good Morning Everybody!

Hi everybody.

For our June posts every Dragons Lair Designs Inspiration Blog Design Team member will be working with the wonderful new collection "A Taste of Summer" that was launched in the Dragons Lair Designs Store on the 1st.

On my own blog on the 1st I did a launch day extra using the new collection.  For that I did a quite brightly coloured, digital, scrapbook layout.  So for my post today I decided to try and inspire you with items from the collection used in quite a different way.

I decided to use a limited number of items from the collection, together with cardstock, an embossing folder and some dies to make an engagement card and a sympathy card.


These are what I used:

Stamping Dragon Designs Item:
Items from the "A Taste of Summer" collection available - here - in the store.

Consumables:
250gsm Super Smooth A4 white cardstock; Tonic Funky Glue; Pinflair Glue Gel; Fingerlift Tape
Equipment:
Scissors; Craft Knife; Baby Blue; Hougie Board; My Craft Studio Elite Software; Assortment of Tattered Lace Dies; Tattered Lace Border Embossing Folder; Baby Blue Die Cutter

Method:

I used my Hougie Board to measure and score 2 x base cards of near enough 6" square, using my scissors to cut off the extra.

I printed out two of the square panels from the collection at 6" square and cut these out and stuck the bright one to the front of one of the cards using fingerlift tape.

I'd bought a small Baby Blue cutting machine when it was on offer so that my youngest nephews could have it to craft when they wanted to, but I wanted to show a way that by playing around the smaller machines could be used to decorate larger pieces.

For the second card I took the 2nd size down of some nesting dies and drew around the outside of it in the centre of the bluey/grey panel and cut it out roughly using a craft knife.  I then put the die on this cut out piece and put it through the Baby Blue to cut it properly.  I cut out the largest of the nesting dies from a piece of the white cardstock.  Using fingerlift tape I stuck the gutted piece of cardstock onto the front of the card, placed the white mat to cover the hole cut in the centre then put the piece cut from the centre on top.  Of course I could have printed out the panel the 2nd time and just cut a piece to fit in the Baby Blue, not used the round about method to gut the larger panel without destroying it, but remember I'm trying to show round about ways of doing larger projects with smaller die cutting machines.

I used the My Craft Studio software simply to place on two different types of flowers from the collection, resizing and copying them numberous times, as well as the hearts element from the collection, until I had a page full of flowers and hearts.  This page I then simply printed out onto the same cardstock I'd used for everything else.  I cut these out as well.

I took some more of the white cardstock and cut out a panel 1cm smaller than the card front.  This I cut into strips, cutting 1cm from the edge of the central panel.  I put one panel through the Baby Blue in an embossing folder, one with a heart die at the top and another with a melded heart die on it.  These three were then stuck to the card front, spaced out so that the background panel could be seen around and through them, using funky glue.

I used more Tattered Lace dies to cut out the praying hands, the greetings, one of them twice, and the flourish.  I used a toneing alcohol marker to colour in one of the greetings and used more funky glue to stick it behind the uncoloured one to create a shaddow.

I then used funky glue to attach flourish, praying hands, hearts and greetings to the front of the cards, and used glue gel to attach the flowers.


 Llongyfarchiadau is Welsh for Congratulations.  I think hearts and flowers from the collection make a nice embelishment on an engagement card.


Meddwl Amdanat is Welsh for Thinking Of You, So I wnated to keep this card quite simple and subdued for this sympathy card.

- o O o -
And that is it from me for today.
Please keep coming back regularly to look at new posts as, over the next few weeks, you'll find various "Inspiration by ..." posts appear on this "Dragons Lair Designs Inspiration Blog", as well as other posts by different Design Team members.  I'll be back with more posts over the coming months as well, so keep an eye out for those.

Till next time - Have Fun Crafting!
Dragons Lair Designs Inspiration Blog Design Team Leader
(And if you are wondering "who's Gwyneth?" - then you'll find an "About Me and My Blog!" piece on my blog.)

------------------------------------------------------------

Stamping Dragon Designs Links
  • If you fancy trying out some of Dragons Lair Designs, please do visit the Store to find all sorts of digital goodies (you'll find great digi-stamps and lots more).
  • We are also on Etsy, so you can pop along - here - to find some Dragons Lair Designs digital downloads.
  • And why not join the "Dragons Lair Designs Fan Group" Facebook group. It's a small, fun, group where we have lots of different activities which include exclusive challenges, daily inspiration and giveaways - and there's a loyalty club for those who take part as well.
  • "Like" Us on Facebook
  • Dragons Lair Designs Challenge Blog : new challenge 1st Friday every month
  • Follow designer Janette Padley on Pinterest!
  • See us on CraftsUPrint
  • And on Etsy

Saturday, 30 April 2016

New Collection Launching Tomorrow - Sneaky Peak!

Sneaky Peak!

Tomorrow a new collection launches in the Dragons Lair Designs online store
It is called Butterfly Garden.
So today I thought I'd give you a sneaky peak of some of the items in the collection by showing you a creation I've made.
 
Flower pot of butterflies.
You can take out butterflies to write your message.
The flower pot is made this way -
  • 8.5 inch x 4inch cardstock
  • score at 1.5 inches and 5 inches
  • measure 1/2 inch in from bottom folded edge
  • cut upto 1 inch folded line edge making pot shape
  • fold 1 inch piece down decorate
  • insert cardstock
  • 3.5inches x 6 inches
  • add your flowers etc to top of card stock and slide into pot


Till next time - Have Fun Crafting!

Lynne


-oOo-

Now that you have had a look at this inspiration blog post why don't you visit some of the other areas in the Dragons Lair Designs family of sites:

We'd love to have you join us in our Fan Group and post up some pictures of any creations you make using any DLD items.

-oOo- 

Tuesday, 5 April 2016

Lynne - Using flowers from the new Artistic Expressions

Lynne Using flowers

from Artistic Expressions.
 Just couldn't
resist making a box of beautiful flowers from the collection.
The box is:
20.5cm x 14cm -
score at 5cm/10cm/15cm/20cm along long edge,
turn sore at 7cm up to 15cm mark.
Cut tab off of top of 0.5c.
Fold cut up to 7cm line at 5cm/10cm/15cm.
Attach background papers to folded down pieces and base of box.
Glue tab to make box.
Cut out flowers and leaves using perspex to get different heights.
Glue 2 strips of card inside box to attach perspex and
decorations to.


Here are some links to the Dragons Lair Designs family of sites you might like to check out:


Follow on - Artistic Expressions

Following on from the launch of the new collection - 

Artistic expressions made by

Lynne

From the mini kit I chose to
make a clutch purse.
Firstly a sheet of cardstock 28cm x 28cm,
score at 7cm each side,
alt.sides score at 10cm,
fold along score lines,
fold and score in corners,
glue to make shape.
Cut 2 pieces background paper 
9.5cm x 13cm for front and back,
make flap with background paper,
decorate with flower elements.

Another way of using Artistic Expressions is
using the frame. I put a photo of my
easter bunny and teddy in,
embelished with butterflies cut from
background paper,
and finished with floweer and ribbon bow.


Here are some links to the Dragons Lair Designs family of sites you might like to check out:

Friday, 18 March 2016

Elves Inspiration from Susan R

Hi Susan R here!

This is another post featuring the latest collection at

ELVES


I was fortunate enough to have a mini kit to play with 
- and I showed you some Elvish tags to whet your appetite at the beginning of the month...


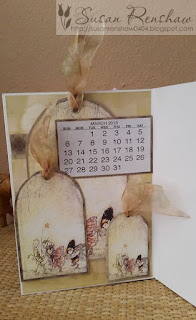
and my calendar...


Today I am showing you some more makes made with elements from this collection.

First, using two of the papers, I have a mason jar.
The parts for this were die cut using a Sizzix die - Canning Jars 3D, assembled with a ribbon attached.


 This treat box is suitable for a few sweets...


Next I made a choice of gift tags to attach to the mason jar - the first is similar to the ones above - just the image cut out and distressed around the edges with 'tea dye'.


The second uses this element from Elves which was a freebie on the blog:


The pieces were cut out, distressed with tea dye, layered up with silicon glue, punched and a ribbon added - this ribbon is one of several I upcycled from Christmas crackers!


 I attached it to the Mason Jar with a small peg.


The third is a kite card - find instructions here. I have used several paper designs, two of them printed back to back.


Hope you like my makes!!


Do take a look at Dragons Lair Designs for 'Elves' and all the other lovely designs!

Happy Crafting!


Wednesday, 1 July 2015

Summer Fun Season At Dragons Lair Designs

Hi everybody!

For July and August we are going to have a "Summer Fun Season" here at Dragons Lair Designs Inspiration Blog.

We are going to let our Design Team members choose their own items from the Dragons Lair Designs Store to work with to make whatever they think is suitable for the theme of "Summer Fun".

I'm looking forward to seeing what they think of as Summer Fun and what creations they make.

  • Is their idea of Summer Fun being able to lock themselves in their craft room and getting messy?
  • Will it be scrapbook pages of holidays or trips out and about? 
  • Will they go for a "wet day" project of colouring in with younger members of the family?
  • Will it be mixed media items including bits picked up from the beach? 
  • Will they prefer to spend their time in their own garden at home - perhaps gardening, or perhaps having BBQs or garden parties having created hand made invites for family and friends?
We'll have to wait and see!  So please do come back regularly during the month to have a look at the new creations made by the Design Team Members.  I'm sure you'll be inspired to craft when looking at their creations.

I've started having a browse around the Dragons Lair Designs store to think of some ideas.  Here are just a few of the digi-stamps that you might find useful in your Summer Fun crafting -

  • What about sending a friend an invite to pop over for a cuppa and a chat using Floral Tea Set


  • Scrapbooking photos taken on a day when everybody had fun cooking, either for a bbq, picnic, or as a "wet day" activity - using Baking Utensils and Baking Day to embelish your layout.


  • Perhaps your idea of summer fun is a day out in a boat, fishing.  If so you might like the digi Fishing Trip.


  • And if you want to just sit back and do nothing then how about Just Chillin.


Got to stop now or the list will go on and on as there's so many digi stamps in the Dragons Lair Designs store to choose from.

I'm going to have a look at the papers and collections next - I think that some of the patterns would be great to make paper bunting to hang out in the garden for a party, and perhaps for children to make paper lanterns to hang as well.

And remember to come join us in the Dragons Lair Designs Fan Group on Facebook as I'm sure there will be some Sumer Fun activities with loyalty points and other prizes to be had throughout the summer.

**********************

We'd love to have you join us in our Fan Group and post up some pictures of any creations you make using DLD items - there are even a few items available for free to Fan Group members.


Dragons Lair Designs Links:

Till next time - Have Fun Crafting!
Dragons Lair Designs Inspiration Blog Design Team Leader
(And if you are wondering "who's Gwyneth?" - then you'll find an "About Me and My Blog!" piece on my blog.)

Monday, 29 June 2015

June Inspiration - using the Sarah Collection

June Inspiration UsingThe Sarah Collection

 Lynne here again.  Wow don't the months just go by so fast.
For June I chose to use elements and papers from
the Sarah collection (which you can find
here ->  http://dragonslairdesigns.com/shop/index.php?main_page=index&cPath=695_741)
It includes some beautiful pieces.

Now to show you my creation -
A teapot and teacup template from my crafting stash were used with papers and elements from the collection to make these.


*********
Links To Some Of The Dragons Lair Designs Family Of Sites You Might Like To Visit:

Thursday, 18 June 2015

Guest DT Inspiration Project by Susan

Hi everybody!

For today's post of a creation to inspire you we invited Susan Renshaw, who's a Design Team member on our sister site, the Dragons Lair Designs Challenge Blog, to be our guest here on the DLD Inspiration blog.

After years of living in various locations around the world, Susan is now living in Derbyshire, UK.  You can read more about her and see her varied work on her blog - Here!

Susan was given a selection of items from the Home Tweet Home Collection to work with and decided to make a little tissue packet box.

She started off by choosing items from within the mini kit she was sent and printing them off.

She cut out and scored the little box.


After constructing the box she decorated it.

Here's the finished item -


You can see Susan's own post about this creation on her blog - Here!


Please do come back regularly over the next few weeks to have a look at the new creations made by the Design Team Members.  I'm sure you'll be inspired to craft when looking at their creations.


Dragons Lair Designs Links:

We'd love to have you join us in our Fan Group and post up some pictures of any creations you make using DLD items - there are even a few items available for free to Fan Group members..

LinkWithin

Related Posts with Thumbnails